Jupico - Application Process and Link
Jupico is a complete all-in-one online payment processing solution and is our preferred partner for online payments. The payment gateway is responsible for securely transmitting payment card data between the online merchant and the payment processor. The Jupico application collects owner and banking details through a secure server.
Jupico Application Process
- Complete the Jupico Account Application
- Send a Voided Check to confirm banking details
Jupico Summary of Benefits
- Total Fees: 2.9% + $0.30 per transaction.
- No Monthly Fees, No Gateway Fees, No Termination Fees.
- Simple Online Application. Get started: payments-onboarding.jupico.com/spillover/
- Fully integrated with Spillover Online Ordering for Refunds/Voids Processing
Jupico Account Application
Step 1. Create An Account
-Open the Application, review the terms and click "Get Started"
-Enter your name and email
-Enter your name and email
-Set up a password for your account
-Check the verification, Check to agree to terms
-Click "Continue"
-Enter your phone number for verification and click "Send SMS" to receive a text verification code.
-Enter the verification code and click "Continue"
Step 2. Complete Your Profile
-Choose "Merchant Type" and complete subsequent Merchant Information page, click "Continue"
*note, it's only required that one owner complete the merchant information page - mark as 100%.
*note the option to Save & Continue any time using the email/password created in step 1.
Step 3. Connect to Bank
-Name your account
-Choose account type
-Enter routing & account numbers
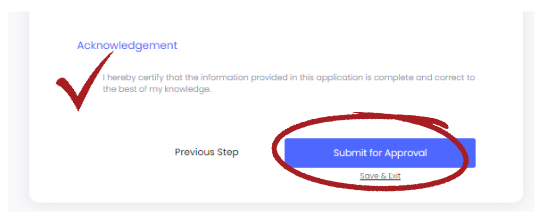
Step 4. Summary
-Confirm Information for business, owner, and bank details
-Check the "Acknowledgement" that info is correct and complete, click "Submit for Approval"
Resuming a partially completed application

If you complete your application in more than 1 sitting you should use this link to resume your partially completed application : https://payments-onboarding.jupiterhq.com/spillover/continue
Adding Another Location
- Log into your Jupico account
- Select "Accounts" from menu
- Select "+ New Merchant Account"
- Select "Yes" when prompted if you'd like to create a new account.
- Complete the application and submit, but be cautious as it will duplicate your existing account information so please be sure to verify that information is accurate for this new account.
*note, use the "Doing Business As" label to name the location. For example, if this location is in a different city then use Doing Business As - City Name.
Related Articles
What Payment Processing Solutions does Spillover Online Ordering Support? (Comparison of Jupico All-In-One Vs Authnet Payment Gateway + MSP)
How does Online Payment Processing differ from POS Payment Processing? A payment gateway is required to process Online Credit Card Payments. The Payment Gateway is the online equivalent of a POS terminal. It verifies credit card details and funding ...FAQ - Online Ordering Solution
What options are there for managing orders? There are multiple options for handling orders and many of these options can be used at the same time. E.g., get a text alert or an automated call if a print fails. SpillOrder iPad App Star Receipt Printer ...Online Ordering - Accounting & Reconciliation
Guidance for accounting to manage and reconcile online ordering revenue across multiple platforms. Accurate reporting will require access to SpillOrder, Jupico (or other online payment gateway account), and Delivery (IHD) accounts. Key Info: ...Adding your Online Ordering Link to Google Business
1. Log into your Google Business Account. If you haven't claimed your Google Business follow these instructions : Claiming your Google Business 2. Click on "Food Ordering" in the left navigation and click Add New Link 3. Enter your Online Ordering ...How to create a Featured Menu Items Category in Online Ordering
Do you have featured items or staff picks you want to highlight to your customers? By directing them towards your top menu items, you can help make their ordering process easier, while driving your sales. Follow this Best Practice Step-By-Step Guide ...